Showing posts with label carving. Show all posts

Carving tepal flower with garlic, video tutorial


Carving tepal flower with garlic, video tutorial


Material:
* Flattened garlic cloves (have three sides)
* Onions leaves or shallot leaves
* Curved knife blades & thin
* Toothpicks

Intruction:
Step 1. Carve a small petal in 3 sides. Using a knife slicing a thin layer on the surface of the garlic cloves. Top petals as thin and thicker cut down, 3mm-5mm from the base to stop.


Note that the dark side is not equal to the narrow side trim was chosen first. The remaining two edges so that the equivalent, not exceed the difference.

Step 2. Continue left sides of sliced ​​garlic cloves. Important not to cut off the knife edge.

Step 3. Sink the flower  in water for about 15-20 minutes to bloom the petals.
 
Step  4.  Select the onions leaves, toothpick inserted into the garlic and onion leaves to make stems body.


 Step 5. The top of the onion leaf cut into 3-4 parts to make sepals. Trim the leaves. We have the flower to decor for food.
it's very simple!
Carving tepal flower with garlic, video tutorial

Transform fashion: Chanel Cut Out Gloves tutorial

Things you need for this DIY:
*unlined vintage leather gloves
*scissors
*an X-acto knife
*hot glue gun
*two pieces of card board or heavy cardstock, one cut to fit inside the palm of the glove and one cut to fit inside a finger of the glove

Total time:
1.5 hours

Total cost:
nothing if you snag a pair from your grandma!

chanel cut out gloves diy
I have kinda stubby hands so I've learned that when gloves are too big for me, the easiest thing to do is cut off the fingers. I recently got a large collection of gloves that once belonged to Rubin's grandmother. Most of them fit me perfectly but a few pairs were a bit to big. They looked like they had never been used so I guess they were too big for her too. I saw these cut out gloves in the Chanel spring 2001 rtw show and became immediately obsessed. I finally got around to making my own.


First I turned the gloves inside out and marked with a pencil where to cut the bottom off, leaving a quarter inch seam allowance. You can kinda see.


Then I chopped em and hot glued the edge over.


Glued vs. unglued.


I chopped off the fingers without measuring but I put them on before I glued the edges to make sure I had cut enough off. You wanna leave yourself about an 8th of an inch extra.

I glued the finger edges in four steps to make it easier; front, back, side, side.

I took the pieces of cardstock and stuck them in the glove. They served as drawing and cutting surfaces.

I used pencil to draw rectangles on the back of the glove.


Here's the tedious part, cutting the rectangles out with my knife.

When I was done and turned them right side out and was good to go.
chanel cut out gloves diy
Enjoy!
Read more: http://semijewels.blogspot.com/2011/03/diy-chanel-cut-out-gloves.html

Halloween crafts: pumpkin spice candy apples

It’s pumpkin and apple season! 

Halloween crafts: pumpkin spice candy apples

I’ve noticed that when candy or chocolate apples are made to look like pumpkins, lines are piped on the surface of the apple, which happens to be quite the opposite of how pumpkins truly are.  I figured, why not imitate the recessed lines of pumpkins by cutting thin slices out of the apple?  So, that’s exactly what I did to make these apples look truly like pumpkins. Then I figured, why not make them taste like pumpkin pie? And that’s exactly what I did.  I threw in some cinnamon, nutmeg, and ginger into the candy melts.  And now my pumpkin candy apples taste just like pumpkin pie. Did the apples brown at the cut edges?  Not so much.  They were immediately dipped in candy melts, which coated them well enough to keep from browning.  Would the apples brown the next day because they’ve been cut?  Hmmm, I’m not so sure.  I ate almost all of them almost immediately. I

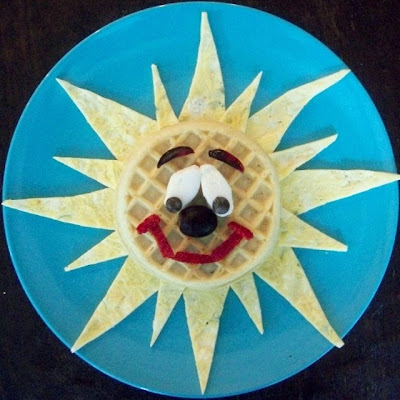
Sunny Breakfast for kids

It's a Sunny Breakfast!


This is a fun and easy way to brighten up those little faces as they sit at the table for breafast!

We made this sunshine breakfast using 1 waffle, 2 beaten eggs, 1 large marshmallow, 1 strawberry, 1 dark grape, & 2 chocolate chips.


We heated up a pan on low heat and poured our 2 beaten eggs in the pan (like you are making a omelette). Put that on a plate and cut it with a pizza cutter for the sun rays. Toast the waffle and put it on the plate. Take the egg sun rays and tuck them under the waffle. We cut a large marshmallow in half with kitchen scissors for the eyes. Cut a grape in half for the nose and cut the other half for the eyebrows. We cut 1 strawberry for the mouth and used chocolate chips for the pupils on the eyes.

Use what you have and be creative! This breakfast is almost gauranteed to put a smile on anyones face!
Source: kitchenfunwithmy3sons.blogspot.com