Felt Apple Coasters
But these days, with first-days-of-school far behind me, I actually look forward to this time of year more than any other. I love the crisp weather, the foliage, my birthday, and I really love apples! Since apples are so quintessentially autumn and because they're so graphically appealing, I was inspired to celebrate this beautiful time of year with a super cute set of Apple Coasters. They'll add a barrel of autumnal cheer to any table! Or start your kid's school year off right with the perfect teacher gift.
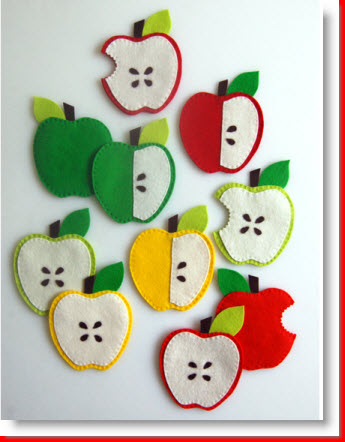
The Apple Coasters are close cousins to my summertime Citrus Coasters, which is to say that they are a total breeze to make, no fancy stitches or skills required. For this season's version we chose our favorite reds, greens, and yellows for our new 100% wool felt Apple Bundle. I just love the way they look all together, so fresh and bright!
Materials
 To make 10 coasters:
- One Apples Felt Bundle
- DMC Embroidery Floss in colors to match the felt. I used: Ecru, 606 (bright red), 743 (yellow), 166 (light green), 905 (dark green), 3031 (dark brown)
- An Apple Coaster Template printed out and cut, available for free download here
Special Equipment:
Cutting
There are three versions of these coasters: The Basic Apple, The Apple with a Bite, and the Segmented Apple. Before you cut out all of the pieces figure out how many Segmented Apples you want to make because they require different cutting.

For each coaster you will need 2 outside pieces. From each piece of the green, red, and yellow felt cut 4 outsides. You will have enough to make 2 coasters from each color. To get four full outside pieces from the felt trace the outside templates as shown above (disregard the leaves if you're cutting from the red or yellow.)
Cut 10 leaves from a combination of the light green and dark green felt. You can fit up to 6 leaves on each of the green felt pieces as shown above.

Cut 10 total apple insides from the ecru felt some regular insides and some half apple insides. If you trace the templates as shown above you can get up to six full insides from each piece.
Cut 10 stems from the brown felt. Cut 4 seeds for each Basic Apple and Apples with a Bite. Cut 2 Apple Seeds for each Segmented Apple.
Basic Apple
 You will need:
- 2 apple outside pieces in the same color
- 1 inside piece
- 4 seeds
- 1 stem
- 1 leaf
- embroidery thread in ecru, dark brown, and in a color to match the outside. Please note, you need to separate the embroidery thread into two strands before you sew with it.

Center the inside on one of the outside pieces and pin it in place.
Using the ecru thread and starting from the back sew the inside to the outside along the edge with a small running stitch.

Make the stitches very neat and small like in the picture above.

Center the four seeds and pin then in place.

Using the dark brown embroidery thread stitch them on with a small running stitch.

Place the stem and leaf at the top of the second outside piece as shown above.

Pin the first outside piece (with the inside and seeds sewn on it) to the second outside piece, sandwiching the stem and the leaf inside the two. Make sure the pin the stem and leaf in place.
 To sew the two outsides together use the matching colored thread and enter between the two outsides, thus hiding the knot.
 Sew around the entire perimeter with a small running stitch. When you get all the way around tie a small knot in the back and then hide the thread end between the layers.
 Trim the outside edges so they are flush with one another and you're all done!
 Here is a picture of the front side of the coaster.
 And here is the back.
Apple with a Bite
 You will need:
- 2 apple outside pieces in the same color
- 1 inside piece
- 4 seeds
- 1 stem
- 1 leaf
- embroidery thread in ecru, dark brown, and in a color to match the outside. Please note, you need to separate the embroidery thread into two strands before you sew with it.
- a bite template

Place both of the outside pieces on top of one another so they are flush.
Center the inside piece on top of the two outside pieces and pin all three layers together.
Trace the bite template on the left side of the pined pieces.
 Using pinking shears cut through all three layers of felt at the same time along the marked bite mark.
 Take away the bottom (second) outside layer and put it aside for now.
Pin the inside to the first outside layer making sure to keep the zig zag of the bite mark lined up.

Using the ecru thread stitch the inside to the outside along the inside edge with a small running stitch.

Center the seeds, pin them on, and then stitch them on with the brown embroidery thread using a small running stitch.
 Arrange the stem and leaf at the top of the second outside piece.
 Pin the second outside to the first, wrong sides together, sandwiching the stem and leaf between the layers. Make sure to pin the stem and leaf in place and that the bite marks are lining up neatly.
 Hiding the knot between the two layers stitch the outsides together using a small running stitch and the matching embroidery thread.
 When you get to the bite stitch along the back, just going through the colored outside layers and not poking through to the ecru layer on the front. The felt is pretty thick so this isn't very hard to do, just pay attention.
 When you get past the bite area continue sewing with the regular small running stitch.
 Once you get all the way around tie a small knot in the back and then pull the thread through the center of the coaster and cut the thread end at the exit point to hide it.
 Here is the finished front:
 And here is the back.
Segmented Apple
 You will need:
- 2 apple outside pieces in the same color
- 1 half inside piece
- 2 seeds
- 1 stem
- 1 leaf
- embroidery thread in ecru, dark brown, and in a color to match the outside. Please note, you need to separate the embroidery thread into two strands before you sew with it.
 Center and pin the half inside piece onto the first outside piece.
Using the ecru thread sew the inside to the outside with a small running stitch.
 Center the two seeds onto the half inside piece and sew them on with the brown embroidery thread and a small running stitch.
Arrange the stem and leaf on top of the second outside piece as shown above.
 Pin the second outside to the first, wrong sides together, sandwiching the stem and leaf between the layers. Make sure to pin the stem and leaf in place.
 Using the matching thread stitch the two outside pieces together around the entire perimeter.
Once you get all the way around tie a small knot in the back and then pull the thread through the center of the coaster and cut the thread end at the exit point to hide it.