Scrap-Tastic Wreath
Now that I accomplished one man-craft over the weekend, I thought it was about time I make something with my husband in mind. With football season coming up, I've already had to put my foot down and tell him we're not buying the $50 Michigan flag. Again. Sorry, honey.
I did decide that a little maize and blue around the house wouldn't be all bad, though. Hey, I'm a good sport, I just don't like to part with ridiculous amounts of cash to prove it. I've been seeing different variations of fall wreaths all over, and I decided we could use a wreath.
I have never owned a wreath. Not even a Christmas one. So our next purchase will need to be a hanger of some sort, because I think I could definitely get on this wreath bandwagon.
I've seen some lovely ribbon-wrapped wreaths posted out there, but it's just not my style. Instead, I opted for a fluffy, scrappy version. And it was extremely easy, if a little time-consuming. A great project to recruit your kids' help with if they are at an appropriate age!

Halloween crafts: Scrap-Tastic Wreath tutorial
Time: 1.5 hours 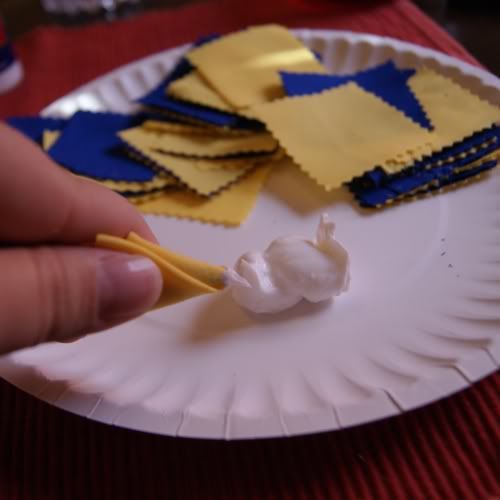


It turned out, my husband was a lot more excited than I thought he would be. I really never make anything for him (if you recall, I'm a terrible cook, so food is out), but he was really happy to be the recipient this time... though I'm just waiting to hear what else we should get to "go" with our new addition to the decor. :)
I did decide that a little maize and blue around the house wouldn't be all bad, though. Hey, I'm a good sport, I just don't like to part with ridiculous amounts of cash to prove it. I've been seeing different variations of fall wreaths all over, and I decided we could use a wreath.
I have never owned a wreath. Not even a Christmas one. So our next purchase will need to be a hanger of some sort, because I think I could definitely get on this wreath bandwagon.
I've seen some lovely ribbon-wrapped wreaths posted out there, but it's just not my style. Instead, I opted for a fluffy, scrappy version. And it was extremely easy, if a little time-consuming. A great project to recruit your kids' help with if they are at an appropriate age!
Halloween crafts: Scrap-Tastic Wreath tutorial
Time: 1.5 hours
- 12" Foam Wreath
- At least 2/3 yard fabric, cut into 1.5 inch squares. I had about 1/3 each of some inexpensive broadcloth on-hand in our team colors, and I used every last inch.
- Glue (I used a fabric and paper craft glue)
- Pencil
- Embellishment as desired (initial, logo, ornament, etc.)
I used pinking shears to cut my fabric into 1.5 inch squares. It gave the edges a little extra frilliness and also ensures that I won't get a bunch of frayed edges. Your squares don't have to be perfect. Then squirt out some glue on a work surface. I like to use a paper plate for this.
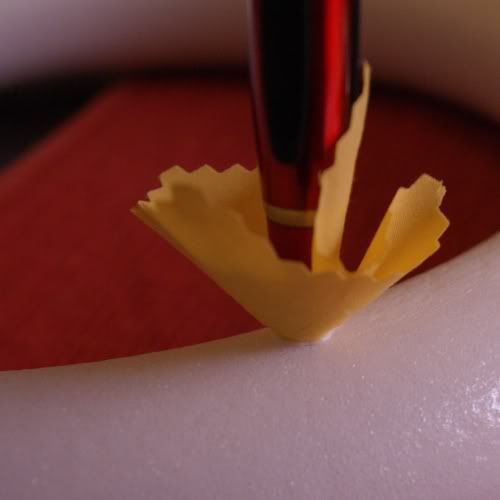
Take your pencil and press it into the center of your fabric square, making a point. You can't see from this photo, but I have this fabric point wrapped around the tip of my pencil. Dip this point pretty liberally into your glue.
Poke it into the foam with the pencil tip. The foam will hold it in place until the glue dries, so it should stay put, just don't get rough with it until everything is dry.
Do this with about {ninethousand} more squares.
Fortunately, I'm exaggerating, but it is a bit tedious. I spaced them about 1/4 inch to 1/2 inch apart from each other.
Cover the top, sides, and front of your wreath. The back can be left blank so it's nice and smooth for hanging.
I bought a little football ornament in the Christmas section of Hobby Lobby. In fact, this was a nice cheap project at $3 in foam until I added an $8 ornament. {sigh} I wasn't sure how I was going to affix it, so I dug through my supplies to look for something that might work, and found a hairpin with a bail, which worked quite nicely! I just used some Amazing E-6000 to adhere it and waited (impatiently) for it to dry.
By the time it was dry enough to add to the wreath, all my daylight was gone, so you get kitchen-lighted photos. And, I also have no place to hang this yet, but I was too impatient to wait to take pictures later today, I wanted to share now. :)
It turned out, my husband was a lot more excited than I thought he would be. I really never make anything for him (if you recall, I'm a terrible cook, so food is out), but he was really happy to be the recipient this time... though I'm just waiting to hear what else we should get to "go" with our new addition to the decor. :)