Paper Bird Tutorial.

First things first, disclaimer time… the artwork I created with this weaving style is entirely my own, however, the concept of the woven bird is quite old. In researching the web I found only a few step-by-step instructions for this style of woven birds. My hope is to provide a tutorial that may be of more help for you. Once you get the knack for these, they are really not too difficult.
Making a Woven Bird

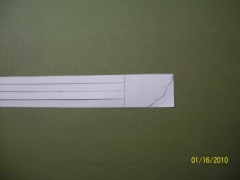
This is the template that I used for this demo bird. It is a 1″ wide strip, the wing is 1½” before the lengthwise cuts are made to form the weaving strips.
The first fold
Fold the first strip down on a 45° angle, crease, and weave under the second strip, over the third, and then under the fourth.
Completed right-hand wing
Fold the second strip down and crease same as the first, weave under and then over the remaining two strips.

Left-hand wing folded upside down
The left hand wing is folded same as the right, only upside down.

Line up back of bird
Flip left hand wing over, and line up the folded edges of the wings. Hint: If you tape your work to a movable mat, you can rotate it to make the weaving easier.

Back of bird woven
Fold the back of the bird, following the pattern already established by weaving the wings. The back will look like a woven diamond with four strips facing up, and four strips facing down.

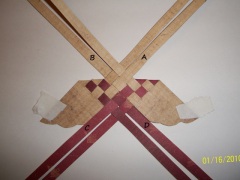
Underside of bird, ready to weave body
Flip work over so that under side of bird is up, tape to work area with drafting tape. The belly of the bird is woven in a diamond pattern as well. Weave the outer strips counter-clockwise, starting with
A.

Bend the strips over, do not crease!!
Strips
A and then
B are bent down and secured temporarily with tape. Do not crease these strips, you will need them to form the 3-D body.

Weaving the body
Strip
C is bent up and then strip
D is bent up and woven under
A. The remaining four strips are bent over and woven in following the pattern already established.

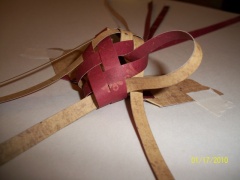
Almost finished
This photo shows the bottom of the bird woven, it will be messy until the last steps. The remaining strips that point upward will become the head of the bird. The strips pointing downward will become the tail. Each pair are pulled through the small openings at the top and bottom. Weave the odd-numbered strips through first, then follow with the even-numbered strips. Note: For the nicest looking bird, I like to weave strips #1 and #5 in a slightly different way.

This strip gets a special weave
Strip #1 is woven under BOTH strips on this side of the bird. Strip #2 is then woven over the top of #1 and through the end strip only. Same goes for strips #5 & #6.
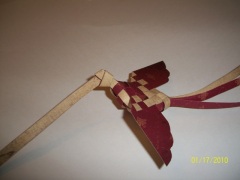
forming the tail and head
The remaining strips are woven under the last strip only.

A nice tight belly
Pull each strip individually to tighten up the body of the bird. This takes some fiddling to straighten up the weaving and to tighten up the end loops so that it will secure. This photo shows what the underside of the bird will look like.

It's all held together with one knot
Read more: http://fabewelous.wordpress.com/2010/01/19/paper-bird-tutorial/


 Left-hand wing folded upside down
 Line up back of bird
 Back of bird woven
 Underside of bird, ready to weave body
 Bend the strips over, do not crease!!
 Weaving the body
 Almost finished
 This strip gets a special weave
 A nice tight belly
 It's all held together with one knot